 |
classicaldressagescotland.com |
| Lesson 2: Working in |
| New web address: www.classicaldressagescotland.com |
| About this site | About us | Personal Tuition | Video analysis | Lesson menu | Portugal and Lusitanos |
| Home Schooling Classical dressage Modern dressage Horse trials Show jumping Glossary Links |
A few years ago I had the privilege to watch
the great German master the late Reiner Klimke preparing his
horses for an international competition at Goodwood. The work
was simple, structured and straightforward - the priority being
to take out any stress and to make the horse supple and obedient
ready for the hard work to be done in the arena. What he did
not do was practise piaffe, pirouettes, passage, changes or any
of the Grand Prix movements. After the competition I had a chat
with Herr Klimke and mentioned that I was surprised how little
he had done with Ahlerich before going into the arena. His reply
to my rather dumb question was:
"If you can ride down the centre line, halt at X, proceed to the C marker, turn left or right and ride the corner and receive 10 marks for the movement your horse is ready for Grand Prix and you will certainly win." The message here is simple - if the basics have been trained and worked correctly, the advanced movements will be easy. If you have ever watched a human athlete getting ready for a race or a jump or any physical exercise, you will see him or her stretching and suppling the body before competing. The horse, the equine athlete, must be prepared the same way. But what is really happening? The priority before any physical exercise must be to gorge the muscles with blood thereby inducing more oxygen into the blood stream to feed the muscles under increased workload. The stretching therefore opens the muscle structure making it easier for blood to be introduced. The muscles are being warmed with the introduction of more blood. For this lesson I will concentrate on the part of the horse that comes under most stress when riding - the horse's back. Any engineer will tell you that the most efficient shape for a bridge should be convex, a smooth round upward shape supported between two uprights. Not straight or concave. You, the rider, are sitting on a bridge when sitting on a horse's back. The ideal then is to make, as far as possible, the horse's back come up into a convex shape. When this is achieved, more of your weight will be carried on the horse's skeletal structure and the horse will be able to use the muscles in his back more efficiently. Ask any human hiker who carries a heavy pack on their back. He or she will hunch forward, round the back, to make the pack easier to carry. Enough of the theory, how do you do it?
Ride corners and circles changing length bend often. You want to allow the horse to stretch and work its muscles freely side to side. When you feel that the horse is being obedient and calm in walk (after about 10 minutes hopefully) go forward into rising trot and go through the same exercises. You will know when you have done enough work if, when you sit down, your horse's head stays down and remains in the same top-line shape and you do not feel any change in rhythm or tempo. This whole exercise should take about 20 minutes.
We put the horse on the aids and then on the bit (see the lessons "On the Aids" and "On the Bit"), we would ride half-halts to balance him and further engage his hind quarters (see the lesson on "Balance, Engagement and Half Halts"). At that point we should be able to ask the horse to do the job in hand (whether it be schooling for classical or competition dressage movements, show-jumping training, or improving the way of going of our horse before we hack out on him). But before you are ready for that, you must be aware of your own position in the saddle and how this affects your horse and your ability to apply the aids. So lesson number three is "The Rider's Position". Remember, no two horses are the same - that's what makes this sport so intriguing. Some of you will have problems or want to know more. Perhaps your horse will not bend and stretch his neck and back. Perhaps you cannot maintain a contact through the bit if you try to soften and end up with a loose rein instead. Whatever the problem, as a member you will be able to give us call via email and we'll get straight back to you. That's what we're here for.
|
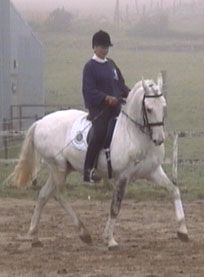
 In
walk initially, encourage your horse to go forward briskly. Don't
let him amble or be lazy. In the first corner or the first circle,
push your horse forward from your inside leg. Try to length bend
him into the shape of the circumference of the circle and take
a feel of the outside rein. Soften your inside rein. As your horse
accepts the outside rein, allow your outside hand to move forward
but keeping a contact. The horse should follow your hand forward
and down. Ideally, the horse's poll (the top of his head) should
come below the height of his wither. The photograph shows Eleanor
with Vivaldi stretching down and forward through his whole length.
This allows the horse to relax, stretch and warm its muscles
prior to working. Also, by stretching round and down, the horse
automatically archs its back upwards a little - making it easier
to carry the rider and freeing its muscles for work. Try leaning
forwards yourself to see the effect it has on the arch of your
back!
In
walk initially, encourage your horse to go forward briskly. Don't
let him amble or be lazy. In the first corner or the first circle,
push your horse forward from your inside leg. Try to length bend
him into the shape of the circumference of the circle and take
a feel of the outside rein. Soften your inside rein. As your horse
accepts the outside rein, allow your outside hand to move forward
but keeping a contact. The horse should follow your hand forward
and down. Ideally, the horse's poll (the top of his head) should
come below the height of his wither. The photograph shows Eleanor
with Vivaldi stretching down and forward through his whole length.
This allows the horse to relax, stretch and warm its muscles
prior to working. Also, by stretching round and down, the horse
automatically archs its back upwards a little - making it easier
to carry the rider and freeing its muscles for work. Try leaning
forwards yourself to see the effect it has on the arch of your
back!
 When
you feel the horse is happy and his back is accepting your weight,
you can begin the next stage of preparing him for work. This
involves changing the horse's way of carrying itself from 'long
and low' to being arched in his neck and back with his quarters
engaged.
When
you feel the horse is happy and his back is accepting your weight,
you can begin the next stage of preparing him for work. This
involves changing the horse's way of carrying itself from 'long
and low' to being arched in his neck and back with his quarters
engaged.