 |
classicaldressagescotland.com |
| Lesson 12: The School Movements |
| New web address: www.classicaldressagescotland.com |
| About this site | About us | Personal Tuition | Video analysis | Lesson menu | Portugal and Lusitanos |
| Home Schooling Classical dressage Modern dressage Horse trials Show jumping Glossary Links |
I'm Lost, Where Do I Go? I remember many years ago, when I first started riding my own horse in an empty
riding school, standing with my horse in the middle of this vast area thinking,
"What on earth do I do now?". Up to this point I had always had an instructor or
a trainer to tell me what to do and where to go, so I was used to leaving all
those decisions up to him or her. Now that I was on my own, I was completely
lost. If only I had had a plan in my head as to what I wanted to achieve, what
I wanted to teach my horse and the exercises or the school movements I needed
to know to get the job done.
I remember many years ago, when I first started riding my own horse in an empty
riding school, standing with my horse in the middle of this vast area thinking,
"What on earth do I do now?". Up to this point I had always had an instructor or
a trainer to tell me what to do and where to go, so I was used to leaving all
those decisions up to him or her. Now that I was on my own, I was completely
lost. If only I had had a plan in my head as to what I wanted to achieve, what
I wanted to teach my horse and the exercises or the school movements I needed
to know to get the job done.
Hopefully this lesson will help you formulate in your mind a training session plan so, unlike me, you won't appear to have lost your marbles and gone brain-dead when you start working your horse. The History and Background From the earliest times, for example the seventeenth century, it was discovered
that the most efficient way to train horses was to create a manege or an enclosed
area and train the horse within that area.
From the earliest times, for example the seventeenth century, it was discovered
that the most efficient way to train horses was to create a manege or an enclosed
area and train the horse within that area.
The reason was that the horse's movements could be controlled, there were constant reference points within the area, and probably the most important thing, the horse was forced to be in the same space as the human being. The horse then had to concentrate on the rider or trainer and not be distracted by wide-open space, the horse's natural environment. The equine thought processes of "fight or flight" had been taken out of the teacher-pupil equation. 
In the mid-nineteenth century, Francois Baucher who trained high school horses for the circus in France, understood the value of the circus ring. Even today, Monty Roberts, the great American horseman, creates a small arena, a small circular cage, to "join-up" with the horse in training. And of course we all know, even non-riders or horse owners, the most famous dressage arena in the world, The Spanish Riding School in Vienna. 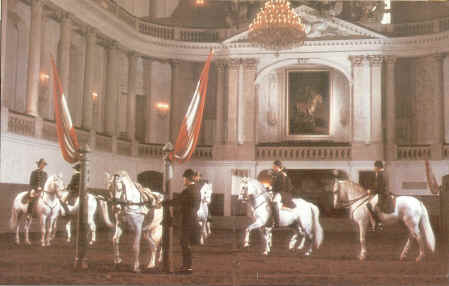
Today, the modern dressage test is ridden in a dressage arena of a predetermined size. I won't go into the full dimensions or letters here. You will be able to get that information from your local or national dressage rulebook, or refer to the glossary. However, the modern dressage arena is perfect for training horses. If you are not lucky enough to have access to a 40x20 or a 60x20 arena, not all is lost. Any sized arena will do so long as you have some reference points around it and that there is some sort of wall. For example, my very good friend Manuel Duarte, a trainer in Portugal, uses a maize field in the summer months, and the crop creates the walls of his arena. He also has a small, and I mean small, indoor arena. I couldn't believe how small this arena was so I paced it out, and it was the same size as my kitchen at home. Really tiny. From here on in I will assume you can get access to some sort of arena so the lesson will refer to letters, center lines and quarter markers. If you have problems envisaging an arena in the space you have, send me an email. Between us we will sort something out. 
The Equine GymnasiumStart to think of your arena as the gymnasium. It's the area that is going to help you achieve what you want from your horse. The corners, the circles the long sides are all tools to be used to get the best from your training sessions. Use your arena as a gymnast would use the gym equipment, parallel bars, vaulting horse etc, or the body-builder uses the power apparatus or the weights.You should also treat the arena as the preparation for your competition. If your horse is accurate at home, it won't come as a surprise or a cultural shock when you insist on accuracy at your competition. Show jumpers and event riders should also practice "accuracy" at home. A Few Basic RulesKnow your arena, the dimensions and where the letters or markers are.Always ride your corners. All circles must be round, not "squaricles". There are no straight lines in a circle. All straight lines must be straight. All movement around the school must be accurate. Go from marker to marker. All sizes of circles must be planned ahead. Always ride transitions or halts at a pre-determined place or reference point. Never use the wall of the school to stop your horse (except in emergency). Practice often riding straight lines away from the wall. Know the "rules of the road" in the school (left hand to left hand). Don't let the wall become your outside leg or rein aid. The Basic 20-metre CircleRefer to dressage arena on definitions page for a picture of the shape and marker letters.It's sometimes very difficult for some of us to envisage a large circle. You're viewing it from an unnatural angle and you have to be aware of your space. Not as easy as you might think. But the basic theory is that the circle must be round, that you arrive at the same place you left, say the "E" marker, and that it is 20-metres in diameter. Try this: Let's assume you are going to ride a 20-metre circle on the left rein at the "B" marker in a large arena. At the "B" marker, put your horse into length bend. The horse's body must be the same shape as the circumference of the circle. This is crucial for this exercise. If your horse is straight and not bent around your inside leg, this method of riding a circle will not work. Ride the circle in quarters: Ride from "B" to the center line, two metres this side of the "I", marker in a straight line. Now ride from the center line straight to the "E" marker. Now ride, once again in a straight line, from the "E" marker to the center line, two metres down from the "L" marker. Finally ride a straight line from the center line back to "B". You are in effect trying to ride a diamond shape. Because your horse is in length bend and will find it impossible to go in a straight line, the diamond will not have any straight lines; therefore it has to be a circle. This method will give you a few benefits. Firstly the circle will be accurate. Secondly, if you make a mistake with one quarter of the circle, you have the other three-quarters to get it right. You will not lose all your marks from the judge. The Basic 10-metre CircleRide this circle in two halves. Shall we say you are riding a 10-metre circle from the "E" marker. At "E" ride a half 10-meter circle to "X" on the center line. From "X" ride a half 10-meter circle back to the "E" marker. And don't forget, you are allowed to move your head. Always look where you are going. Not just with your eyes but with your whole head. On a 10-meter circle, your peripheral vision will not cover the whole circle.By knowing how to ride these two basic circles and using reference points to get accuracy, you will be able to ride any size circle in the manege as part of your training regime and the school movements will become easier and simpler. You will be able to concentrate more on your horse and less on where you are going. Using the School to Improve Changes of Length BendYou will have four opportunities to practice length bend every time you ride or go large around the track in the complete school. The four corners. Always ride your corners.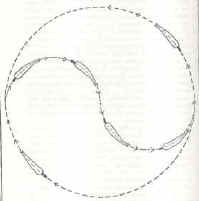
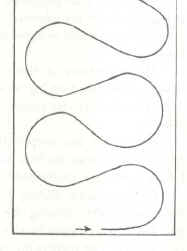
Change of Rein Within a 20-metre CircleThe length bend is ridden when you leave the track. Length bend is also practiced when you change rein over the center line. Don't forget, be accurate.The Serpentine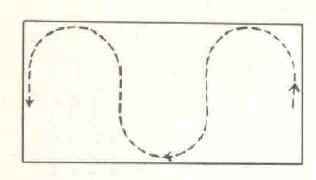 The serpentine is a very useful and versatile exercise for discipline, accuracy
and of course, changing length bend. The serpentine can be of any size, any
amount of loops in a given area. For example, three equal loops or five equal
loops. It will depend on your horse's suppleness and training, you choose.
The serpentine is a very useful and versatile exercise for discipline, accuracy
and of course, changing length bend. The serpentine can be of any size, any
amount of loops in a given area. For example, three equal loops or five equal
loops. It will depend on your horse's suppleness and training, you choose.
It can be ridden as you would in a dressage test, having your horse straight across the center line, or the method I prefer when a horse is in training, coming back on yourself and getting the maximum amount of length bend change. Using the latter method also lets you put far more loops into the arena. This exercise is also great for you the rider in finding your way around an arena. You really must concentrate on accuracy until it becomes second nature. Itís important that you get all the loops the same size. Not easy, but it will come with practice. Two 10-metre Circles From the Center Line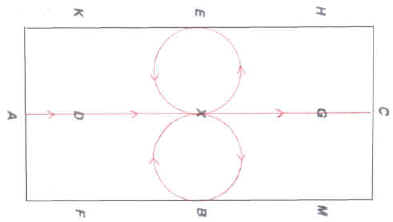
This movement is used in one of the British medium dressage tests but I find it's a good schooling exercise. Ride down the center line. At the X marker, circle left or right 10-metres with the correct length bend. 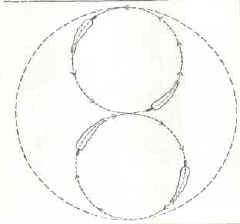
At the X marker, ride one or two strides down the center line changing your length bend to prepare for the circle in the other direction. Just past X ride a 10-metre circle. On returning to X, ride down the center line. In effect you have ridden a figure of eight at the X marker. Using the School to Prepare for Future, More Advanced LessonsA Five-metre Loop From the Track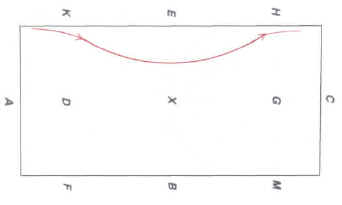
Half 10-metre Circle or Volte Incline Back to the Track 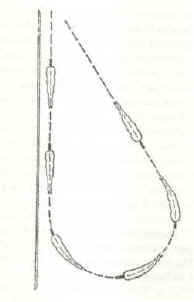
Both these exercises are very good once again for riding the length bend, but also in preparation for the lateral work, either leg yielding or half pass. Once your horse is used to this exercise, encourage him to move away from your leg laterally. He will find this easy because he will be drawn through habit and training towards the track from the half circle. Once he has learned this lesson you will be able to take the lateral movement more and more away from the wall or track until you are either leg yielding or half passing across the whole arena. Once again, it's really important to be accurate so use the letters or reference points. Lateral work, or as known in the trade as "going sideyways" will be the subject of future lessons. The Turn on the Haunches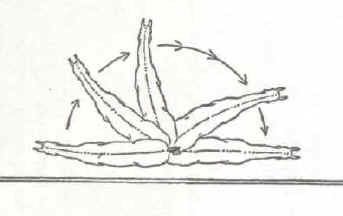
This movement, using the wall of the school, is preparation for not only lateral work, but also walk and canter pirouettes. The turn on the haunches is the smallest turn that can be made. It must be taught from the halt or at the walk. The forehand describes a half circle around the hind legs. The inside hind leg turns in the same place being lifted and replaced in the rhythm of walk (even if the movement has been ridden from halt) and forms the center of a half circle, while the outside leg performs a small circle around the inside leg. These are the aids. Go forward into a halt. Finish the halt with the horse four square. The inside rein leads the forehand into the turn. Open the inside rein away from the horse's neck. The inside leg on the girth encourages bend (just see your horse's inside eye), and maintains the movement of the legs. Ideally a marching pace as in walk. The outside leg prevents the horse from stepping back. The outside rein, lightly applied, defines the degree of neck bend and prevents the horse from falling into the turn or from rushing the movement. The outside leg, behind the girth, asks for the turn around the inside leg. Think of your outside leg asking your horse's hind quarters to traverse or make a small circle around a dinner plate laid on the ground. Both legs must push forward the moment the horse shows any sign of stepping back. A big no-no in this exercise. Finish the exercise with a halt then a brisk forward march or trot. If you have ridden the turn from walk without a halt, immediately trot forward after the movement. The Turn on the ForehandI do not like, nor do I teach any of my clients to turn on the forehand. We spend most of our waking hours trying to find exercises and better ways to bring our horses off the forehand and put them back onto their hocks. The turn on the forehand just encourages a horse to lean onto the hand and go on their forehand. This movement is not a preparation for anything except bad posture. But that's only my opinion. If you find use in the movement, by all means ride it.Using the School to Improve Way of Going and CadenceLengthening and ShorteningThere are many ways to ride this exercise but this is the first step to teach your horse transitions within a pace using the arena. For example to lengthen and shorten the trot or canter. I will explain the exercise using trot, but it works equally as well in cater. In working trot go on either rein down the long side of the arena. As you approach the corner, start to shorten the stride. Obviously length bending for the corner at the same time. Ride the short end of the school in shortened strides but going forward with energy. Ride the next corner in the same shortened stride. As the inside hind leg becomes loaded in the corner, i.e. more weight is being put on that leg, ask your horse to lengthen his stride out of the corner. Don't let him run away from you. Try and keep him in balance. Because the shortened strides and the corner have forced him to sit or engage his hindquarters, you should be able to keep the driving or impulsion power onto the hindquarters down the next long side. More about lengthening and extended paces in a later lesson. The above is just a first step and to show you how the arena can help you balance your horse. To Sum UpThere are literally hundreds of exercises that you can practice using the school. Just a few have been mentioned above. More will be discussed and put forward in future lessons.When you are walking or hacking around to your arena or your training area getting ready to work, try and formulate a plan of action in your head. Think about what you want to achieve in that day's training session and stick to it. For example, if you are having difficulty with bending to the right, ride more circles of different sizes to the right. If you're having a problem with your horse coming off your leg and going forward, make transitions at specific markers and make sure he is sharp away from the marker when asked to go forward. Back your leg up with your whip if he is being lazy. But don't forget to reward him when he has pleased you and gone forward with a light and subtle aid. Always try and be accurate. You should aim for the marker to be at your leg or the center of the horse. This bit of the "classical" way of training is a precise science. Get to know your arena. Study the relative measurements and sizes and learn the letters and where they are. Try and put all your school movements together into a logical and flowing order. Ride a dressage test in your head putting all your favorite and beneficial school movements together. Always length bend for circles and corners, always straight when going down the track, quarter marker or center line. Always see where you're going. Look with your entire head. Don't just rely on your peripheral vision. Be courteous to other arena users. Know the "rules of the road" and if another rider is having problems, stay away. If you're having problems, stay away from other riders. Don't pass too close to another horse especially if you're practicing lengthened or extended paces. If you can, always ride in your arena with music. It develops rhythm and relaxation. I have a huge sound system in my indoor school and I wouldn't be without it. Be imaginative, have a try at inventing some of your own school movements that you feel will benefit and help any problems that you have with your horse. Practice, practice and more practice. The Nuno Oliveira quote this month is really apt:
Keep those emails coming. I'm here to help. Don't struggle on your own. And as always, be kind to your horse. He doesn't have access to classicaldressagescotland.com so how does he know what you have planned for him. Good luck with the lesson.
|