 |
classicaldressagescotland.com |
| Lesson 14: Flying Changes (Part 2) |
| New web address: www.classicaldressagescotland.com |
| About this site | About us | Personal Tuition | Video analysis | Lesson menu | Portugal and Lusitanos |
| Home Schooling Classical dressage Modern dressage Horse trials Show jumping Glossary Links |
For me personally, the greatest feeling of exhilaration and satisfaction I get from a
trained dressage horse, is to ride flying changes. I just love the feeling. To
ask my horse to, say, perform five flying changes of leg every fourth stride
across the diagonal and feel the tempo and the changes happen as if by magic. It
never ceases to amaze me that this huge animal with all its strength, bulk and
stamina can be so light on its feet as to appear to be dancing across the
arena, and with very little effort by the rider.
In this lesson I will try and teach you to train and ride flying changes of leg that will at the end of the day appear effortless and easy. Once you have mastered the technique you will have every bystander and spectator congratulating you and telling you what a wonderful horse you have and how come he does this sort of thing on its own. As an aside, it will also increase your horse's value to a prospective buyer. In part one of this lesson I attempted to teach you how to start your young horse in the flying changes or in this case, changes of leg in the canter; a subtle difference. Of course it would be a wonderful bonus if your young horse could achieve correct flying changes at that stage. But I hope I made it clear that all you're looking for in the initial training is that changes of leg while in canter are normal and acceptable and nothing to get too worked up about. If you have an older horse, and I mean a horse above the age of five, and it has not been taught the changes, start your training as if your horse were younger, under five, and follow the lesson in part one. As soon as your horse settles down to changing his legs within the canter, you are ready to train him to truly flying change. It will also help at this stage if your horse can do a simple change of leg; a transition from canter, to walk, to canter, without any trot strides. I must emphasise at this point that this method of teaching the changes to both horse and rider is my own. I have tried to follow the teachings of various masters and trainers but found at the end of the day that this method worked for me and I also found it easy. It's difficult enough just coping with the horse and all that entails so it's a tremendous bonus if something is found to be "easy". The aids for the flying changes can be broken down into two parts. If you start with the aids in part one, the aids for part two will gradually take over as the training and confidence in both you and your horse progresses. It's All In the Rhythm Man From here on in I will assume that you have completed Flying Changes (Part 1). I will also assume you know that the canter has a three-time beat and that you know the sequence of legs in canter (see definitions). I remember some years ago that I attended a clinic by one of this country's leading riders as a spectator. It must have been more years than I care to remember because then I had never even sat on a horse that could flying-change. I was delighted when the trainer started to teach his client the aids for the changes. I was about to learn something that up to that moment had been a complete mystery to me. When I left the training session that afternoon I vowed that I was never going to ride a horse again and that I would take up something safe like nude sky diving or answering back to my wife. The instructor got his poor client so confused and in a state of complete mental block that she appeared to the audience to be in complete breakdown, brain dead and her tears of frustration did not help the overall effect. And all this was because the trainer was trying to convince his client that for the horse to change legs in mid-air she should apply her aids, her leg on her horse's side when one particular hind leg was about to hit the ground. As with most people, it was difficult for her to calculate what leg was on the ground at any one moment and impossible to gauge when a leg was about to hit the ground. It was significant that the great man did not offer to get on her horse and show her how to do it. Try to think of each canter stride as being one entity and not the distinctive three beats. Count in your head the complete canter sequence as "one" and then "two" and "three" etc. Don't worry where at any given time your horse's legs are and what leg is on the ground or above the ground or whether you are in suspension. It will only confuse matters. Practice this counting for a couple of training sessions before trying the changes. Learn to feel the canter. Feel each bound of the canter come up through your body and let the tempo seep into your own natural rhythm. If you have a problem with this, try getting a friend to count for you from the ground. Get your helper to shout "now" every time the inside hind leg hits the ground. Or, if you are lucky enough, being able to ride to music will certainly help. Once you have got the rhythm of the canter you can start the changes. The Aids If you have been working with a young horse and have started the changes of leg in canter, I said it would help if you asked for the changes also in the same place, the same spot in the school. Start to work the correct changes at the same place. I nearly always use the short diagonal from letter R to V and from S to P with the change over X. In a short arena you could change the diagonal just past H or M to F or K with the change over X. It doesn�t really matter so long as your horse is comfortable and familiar with the exercise. If you can, ride a few simple changes of leg. The transitions will put the idea into your horse's head that changes of rein and direction and lead leg are the order of the day and it will also help to engage the hindquarters and improve balance. Try to get into the habit when cantering, even if you're not going to flying change, of carrying you're outside leg just behind the girth, but passive. If your horse starts to swing his quarters in you will know that you are using too much outside leg. The outside leg is just there. As you approach the spot where you want the change, start feeling the canter rhythm, the canter sequence before you want the change. Bring your outside leg forward to the girth. As your outside leg comes to the girth, take your inside leg behind the girth and ask for the change. What has happened here is that as you're approaching the flying change you have said to your horse "Hey, there's a flying change coming, now change!" If you say that sentence in your head as you change you will get the correct timing. If the change does not happen straight away, don't worry. Try the exercise again but as your outside leg goes behind the girth for the change, just a little tap with the whip or spur will reinforce your aid. As soon as your horse changes, reward him. Tell him he is the best thing since sliced bread. 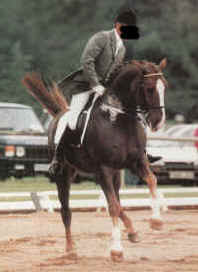
At this stage you, the rider, will have an intense and extreme urge to throw your body weight and balance over to the side that you're changing to. Resist it. Please do not do it. Your horse does not need it. In fact it is the worst rider fault that you could commit when training or riding changes. One of the reasons I feel that you will want to throw your weight about is that you will have seen other riders do it. It has become the norm with many top-class riders. It is ugly, it is unfair to the horse, and it is not classical. As you can see from this picture, the horse is not straight, it is off balance and its head and neck are twisted. 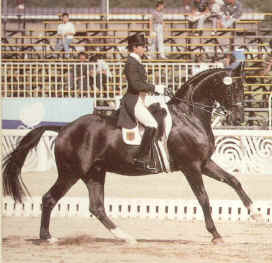
In competition dressage there is no such thing as a flying change around a circle or on a bend. They are judged on straightness. If you start leaping from side to side in the saddle, the horse will not remain straight and you should loose marks. Stay still in the saddle with your shoulders square, head held high and straight, and absorb the bound of the change in your back. You will now find that your horse will have a preference to change from one side rather than the other. Don't worry; this is normal. Practice for the first two or three sessions the change only on the preferred side. Get the change absolutely established on that side before carrying on with the other side. I find that if I train a horse to change, shall we say from right to left, for a couple of days, and get this change working, it will only take a couple of sessions to train from left to right insisting that the horse obey the new outside leg. Once you have got your horse changing to both sides, ride the sticky side a few more times in each session to get the changes working equally from left to right lead leg. If for any reason your horse does not change when you put your leg back behind the girth, don't leave your leg there. Bring your leg back to the girth, then back behind the girth (backed up by the whip or spur if necessary) and ask again. Keep your inside leg still. On occasions, normally at the beginning of your horses training in flying changes and on his sticky/stiff side, he will only change at the front and not the back and give you a disunited canter. This is a common problem. What happens here is that your horse feels he has not got enough lift in his canter to swing his legs through without touching the ground. Make sure that you are not over riding, grinding down into the saddle or becoming stiff at the moment you ask for the change. If you're sure it's not a rider error, bring your horse back to trot, not walk, and canter off on the lead leg you were asking for. Then try again. If the problem persists, work on changes of pace within the canter. Say down the long side, ask for lengthened stride, bring him back to collected or working canter, then lengthen again until you feel the canter lift and is sharp from your leg. You might have to touch him with the whip or spur if he is being lazy. Ride a few simple changes of leg but make the upward transition really positive. Once again you might have to touch him with the whip or spur if he is being lazy. Then ask for the flying change again. If the problem is still there, then you must insist with the whip that he changes behind. Put him into a circle, not too small, fifteen meters would be good in the disunited canter. Touch him with the whip behind your leg that is back behind the girth until he changes into true canter. As soon as he does, bring him back to walk, let him stretch and reward him. After a couple of minutes, ride the exercise again. You will now find that on occasions your horse will change inadvertently while you are practicing counter canter. This again is normal. If he does change, shall we say in the corner, assess whether your leg has moved. If it has then it's your mistake. Keep your legs still with the inside leg behind the girth. (Don't forget you're in counter canter, your outside leg behind the girth becomes the inside leg behind the girth). If you feel that the horse has just changed because of confusion or he just felt like it, don�t punish him. Just bring him back into walk, (simple change) if you can, or trot and ask for counter canter lead. Reward him if he strikes off in counter canter and reward him again when you go around the corner or circle successfully in counter canter. The Do's and Don'ts List Have control of the canter. If your horse cannot be touched with the leg or the whip or spur without running away, postpone the changes until he is under control, obedient and on the bit./p> Learn to "feel" the canter. Let your body learn the tempo and the rhythm of the whole sequence of stride. Not paramount but it will help if you can ride simple changes of leg. In the initial stages, start the changes in the same place in the school. The routine and familiarity will help your horse cope with this new lesson. Always ride your horse forward and straight. No length bend. Don't try and crank your horse's neck to one side or the other for the change. Have him equal in both reins. Do not throw your weight and balance around. Remain straight in the saddle. A horse will always be able to change better to one side rather than the other. This is normal. Once you have got the changes working, don't over ride them. Don't sicken your horse with the exercise. Even though you have the changes working correctly in you're training sessions. Use the changes while working in. Keep it fun for you and the horse. At these initial stages don't let anybody else try the changes on your horse. You have learned the tempo and the feeling for your horse and the feel of the change. Another rider will not have this experience, even an advanced trainer. Confusion is the enemy of teaching flying changes. Practice counter canter. It's nothing but a canter without a flying change. If you can, ride to music. It helps with tempo and rhythm. If you get disunited canter, don't worry, but don't ignore it. If at all possible, find a friend or a trainer who has a horse with established changes and get a ride on it. Nothing can substitute for a lesson on a horse that knows his job and can teach you the "feel". Tempi-Changes or Putting the Bounce In 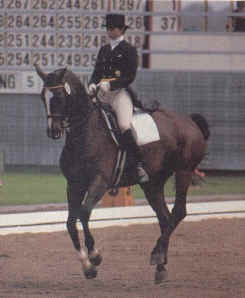
By now you should be able to ride single flying changes across the diagonal of your school without any fuss or bother, totally at your command and with the change coming though correctly. For example the horse is changing front and back and not giving you a disunited canter. Is maintaining forwardness and tempo and is not apprehensive or nervous with the lesson. You will also note that your horse's canter has improved and is now far bouncier and cadenced. Your horse is ready to learn the tempi-changes. The first step is to start teaching your horse the single flying changes in different parts of the school. If you have followed all the above lessons, this should not be a problem. As your horse advances, he is going to be very aware and sharp off your leg. If you carry on using your outside leg back behind the girth to get your changes, your horse will start to swing his quarters away and not be straight. This is as it should be. Hopefully you are teaching your horse lateral work in all paces and the outside leg is one of the aids for your horse to go sideways. So at this advanced stage we must refine the change aids and use something else to signal the change. Your leg will always go a little behind the girth but very subtle and only by a very small amount. So get off your horse and come for a walk! 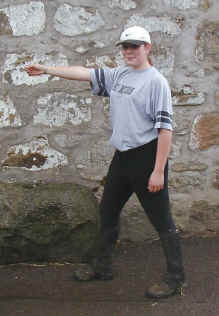
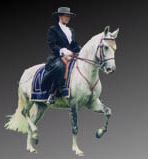
Have you ever seen soldiers or a body of men marching where one poor recruit has got out of step with the rest of the troop and is swinging his arms in time with his colleague in front but his legs are out of sync. That �s what I want you to do. Start marching, swing your arms up to shoulder height, but at the same side as your leg: right arm, right leg; left arm, left leg. You had better do this in private. It is not a pretty sight. I asked Eleanor, my wife, to do this for a photograph but she refused and I wasn't doing it! So I got Susie, my groom to pose. She couldn't argue! 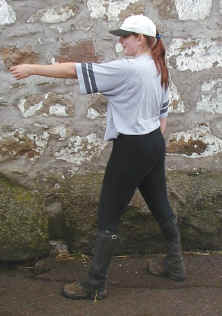 What you will feel while you are marching along is that your hips are rotating. Not swinging
from side to side. If they are, you're not doing it right. Your hips should be
moving and coming forward with your legs. Left leg forward, left hip forward.
Right leg forward, right hip forward. This is the feel I want you to take to
your horse. The swinging of the arms will just emphasize the feeling. A
cross-country skier will know exactly what I mean. It's how they propel
themselves along with the ski pole pushing on the same side as the ski that's
on the snow.
What you will feel while you are marching along is that your hips are rotating. Not swinging
from side to side. If they are, you're not doing it right. Your hips should be
moving and coming forward with your legs. Left leg forward, left hip forward.
Right leg forward, right hip forward. This is the feel I want you to take to
your horse. The swinging of the arms will just emphasize the feeling. A
cross-country skier will know exactly what I mean. It's how they propel
themselves along with the ski pole pushing on the same side as the ski that's
on the snow.
OK, you can stop looking like an idiot and get back on your horse. By now your horse is doing single changes anywhere you ask him to change. Ride him down the long side about three meters from the track. Come out of the corner and make him straight. That �s very important. Have him equal in both reins, riding down a corridor created by your legs. If he is not straight, or hanging onto one side of the bit, don't change. Ride for straightness first. And keep the canter bright. When you feel the horse is ready, ask for a single change. If he changes, carry on riding straight and ask for another change. If that works OK ask for another change back onto the lead leg that will take him around the next corner with correct lead leg. Ask for the changes in exactly the same way as you have been doing, with your legs. Now over a period of time, slowly make your leg aids more light and subtle and not so far back behind the girth, but try a rotate your hips in exactly the same way as you were marching out of step. If you have been using your legs correctly for the single changes, your hips are already moving in the correct direction. This part of the training can take some time. There are several reasons for that. The first is that your horse is used to feeling your outside leg come back as the signal to change. As you refine that aid and make it lighter and less obvious, he won't recognize the aid as the signal. You might once again have to touch him with the whip or spur to confirm that the change should happen. Secondly, you are not going to be consistent with your aids at first. You will have to be very precise with where your legs are on his side at any given moment, and ensure that your hips are pushing the change through and not grinding down on his back. Not easy. Although getting the very subtle aids correct is going to take time you can still ride tempi-changes. It's just that they will not be perfect for some time and your horse may swing his quarters a little. If you can get the three changes of leg down the long side of the school then its time to count the strides between changes. So we will start with the four times change. Flying change, four strides, flying change four strides etc. I will also use the Prix St George movement of five flying changes every fourth stride across the diagonal from K to M. It's best always to do an odd number of strides across the diagonal. This is because it will put you on the correct lead leg to negotiate the next corner, and your accuracy will be a bit suspect to start with. If you do run out of space, at least you will be on the correct lead leg for the corner. This is how you will count your changes: The count for five flying changes every fourth stride Change - 2 - 3 - 4 - (2) - 2 - 3 - 4 - (3) - 2 - 3 - 4 - (4) - 2 - 3 - 4 - (5) - 2 - 3 - 4 I know it looks complicated, but its not really. But it will take practice. Count the flying change as the first stride. And each flying change will be counted as the number of changes done (in brackets). The rest of the count is strides in between changes. Prepare for the next change on the last number in the count. On number 4 for four times changes and number 3 for three times changes, etc. The count for five flying changes every three strides Change - 2 - 3 - (2) - 2 - 3 - (3) - 2 - 3 - (4) - 2 - 3 - (5) - 2 - 3 The count for five flying changes every two strides Change - 2 - (2) - 2 - (3) - 2 - (4) - 2 - (5) - 2 The count for five flying changes every stride Change - (2) - (3) - (4) - (5) Your biggest problem when starting to put the flying changes together is that the canter will slow down and you will loose impulsion. Try to remember that your horse knows how to change. You have taken time to teach him to change when you want him to, so that part of the movement should be easy, What is going to be difficult is keeping your horse going. Ride the canter between the changes; keep the canter forward, with bounce and impulsion. 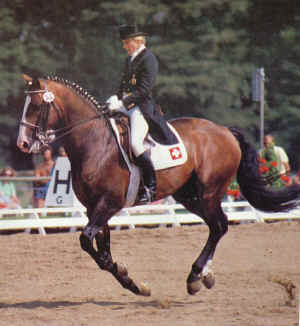
Now what might happen is that you will have the tendency to over ride the canter. You will become stiff and the horse needs to move freely. Chill out, stay relaxed, and just swing with the horse. I find it easier to swing and move with the changes if I sing rather than say the count in my head. Really try to get the beat and the rhythm. Try and think of dancing across the arena. I promise that if you enjoy doing tempi-changes, your horse will enjoy the movement as well. Start the changes as soon as you can. You don't want to run out of room. Come around the corner, turn at K, F, H or M, ride two strides and then ride the first change (number 1). That should give you enough room to rebalance your horse before straightening him at the marker before the corner. 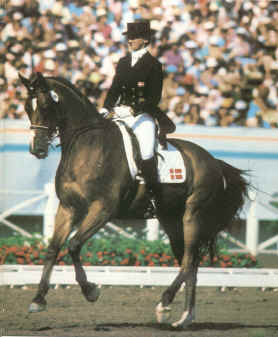
If your horse starts to move away from the straight and narrow when you start tempi-changes. Don't be too concerned. Just make sure you have him equal in both reins and that you are sitting straight and sitting still. As he gets his balance and confidence, he will straighten up. Please, please hold in your mind a picture of the rider opposite, not in the picture below. 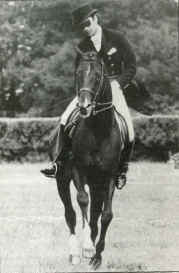
You want your horse to bounce through the changes, so ride with a light seat and do not grind down or over-ride him with your seat. Always be aware that as you progress, the end goal or result of all this training will be that you are going to substitute your leg movement with the pushing forward of the hips, so it appears to the observer that your are doing nothing to make your horse dance. As your leg comes back behind the girth for the change, push your inside hip forward. It's a natural progression. If you think about it, your inside hip will go forward anyway when you bring the opposite leg back. Don't forget to do the exercise on both reins. In the two times changes, really swing with your horse. It's a great feeling if you let your body feel! When you first start tempi changes, try and get a friend to watch and tell you if the horse's changes are true and that you're getting the correct number of canter strides between the changes. Sometimes it's difficult in the beginning to feel any errors in pace and count. If your horse goes disunited during the tempi-changes, go back to riding just a few changes down the long side and iron out any problems. Occasionally put the changes together with other movements in preparation for competition. Don't always ride the changes, stop, and reward your horse. You don't want to get him used to stopping for his goodies after the exercise. It will be difficult to break the habit. If you ride in an indoor school, occasionally practice the changes outside. And have fun. I will post another lesson in the future discussing the one-time changes. In my opinion, the one times are ridden a little differently from four's three's and two's, so I think they deserve a complete lesson in their own right. If you would like this lesson sooner than later, email me. As per usual, if you have any problems with the above exercises or you would just like to discuss or ask questions, email me. "There is a saying that the horse should enjoy himself in his work, otherwise neither the rider nor the horse would be able to give an elegant performance". PLUVINEL
|